 Top of page
 Picture of Page
Former Apple Discussion Board Poster.
Apple Enthusiast but not a zealot about it.


iChat 5 comes with Snow Leopard (OS 10.6.x). At the time of writing that is 10.6 through 10.6.3 iChat was updated to verion 5.0.1 in 10.6.2 and to version 5.0.3 in 10.6.3
These pages have sat here since 2008 with no update. In that time the AIM servers have been closed down (2017) and iChat has been superseded by Message and FaceTime. That effectively makes this a sort of Historical Document of how it worked.
As with other versions here are the links to:
So you have your nice new Screen Name (Or an existing one) and you are ready to start to use iChat to chat with your Buddies
This will mean starting up iChat and if you have not done it before it will run, what are commonly referred to as, the Start Up Screens. These are a series of windows or panes where you enter your details in to Start iChat. This basically formalises the link between Your Address Book, iChat and the service the Screen Name belongs to.
Once you have filled in your Real Name (it may be pre-filled with your Address Book details), chosen the Account Type and Screen Name, you can hit the Continue button.
This will take you to the second screen asking if you want to Enable Bonjour. As you can see from the Picture it essentially a Yes/No option. You don't need it if you have no other Macs on your LAN. It can also be turned On later if required.
Since iChat 3 you get the choice to Add a Jabber ID if you have one. You do not have to do this now and can add it later. See the Alternative Section.
From there you get to see the Video Preview picture from the camera and the grey bar under the pic will show a moving green representation of the Voice volume if you talk. (input is controlled in System Preferences > Sound > Input tab)
It is then finalised with a Done Screen to Confirm and iChat will now Launch the Buddy list(s).
What is in the Buddy List depends if you have them already (Buddies) or need to Add them. (See below)
The Welcome Screen

 The Bits where the names go
Notice the drop down to select @mac, MobileMe or AIM. The First Name, Last Name tend to be Pre-filled from your Address Book.
The "Get an iChat Account" button did link to an AIM Registration page if the AIM option is in the drop down in the middle of the Pane. If you chose one of the two Apple choices it went to the @mac.com registration page.
Bonjour Request Page

Jabber Account Screen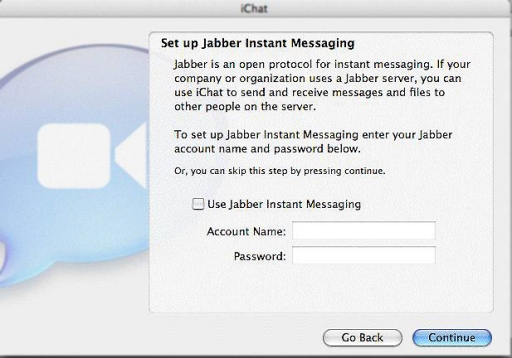
Followed by the Jabber ID fill in Screen. In iChat 5 there is a section below the password to make some Server settings if you need to.
By default the iChat software will take the suffix part of your ID (@aJabberServiceName.com) and use this for the Server name. If this name is known to be Different or the ports are different then the option under the password box can be used for this.
That is followed by the Video (Preview)Screen.

This is followed by a Done Screen to Confirm which I am not showing here.
Bigger Pictures via an Index. (very similar but from iChat 3)
Like most things there is an alternative way of doing this.
Basically it is using the method to set up a New Account (Screen Name) when you have not actually set one up in the first place, as it is possible to Click through the Start Up Screens without entering anything.

Launch iChat and go to the iChat Menu and select Preferences. (The Pic shows Accounts being selected and you Need Preferences, 4 items up)
The next window will show a range of icons across the Toolbar and you want the Accounts one to be Highlighted/selected. See below.

If you are familiar with iChat 1 or 2 but not 3 or 4 then you will see many things from different panes in the previous version(s) have now been gathered in this pane but have tabs to access them.
You can set up more than one Screen Name and use this same spot to change between them if you only want one name logged in at once. Starting with the List on the left. At the bottom is the Add + button. This will open a choice in iChat 5 to add AIM valid names listed under AIM and .mac or Mobileme for an AIM Buddy List and below a divider Jabber IDs and GoogleTalk.
(Notes: If you have one Buddy List that logs into the AIM service then it will be titled "AIM Buddy List" on top of it's window irrespective if it is an AIM name or an Apple one. The same is true of having one Jabber ID. This is certainly true in iChat 3 where you can onluy have one "AIM", the Bonjour and A Jabber account. In later versions if you have more then they take on the Screen Name to identify themselves.)
So, if you have got here, with no Screen Name entered in the Start Up Screens, enter the Information now - after choosing either AIM, .Mac, MobileMe or a Jabber ID type.
Dealing with an AIM valid Name, you get to have a pane that is similar to the Welcome Screen version in that you can change the type between .Mac (@mac.com). MobileMe and an AIM name. Leaving the Password blank will get iChat to prompt you each time you try to Log in to AIM. Otherwise it is stored in the Keychain like other passwords.
The Name is then added to the List. Second, third or more Names can be added in the same way.
A New item. Since iChat 4 this list is now drag-able - meaning that you can put the List in any order you want. When several Screen Names are logged in this will have a direct consequence to the order they appear in the Window Menu. (Advice: If you want a new item at the top, pull lower ones to the second slot then drag the top one down rather than trying to place one directly to the top)
You then get to see the section on the right, with the Information tab selected, filled out with the info you just entered. You get to select which ones are Active if there is more than one (each name is selected in turn and Select/Deselect the "Use this Account" option) and whether iChat logs that Name in when iChat is started up.
If you are logged out then you can change the Description (how the name displays in the List and in the iChat Menu > Accounts for Logging In and Out or in the Window Menu when Logged in).

This was a separate Privacy Pane in iChat 1 and 2. This tab only applies to AIM valid names (AIM and Apple Screen Names)
It has the same methods of saying who see you as On-Line.
Allow All does what it says. Allowing Buddy List Only means that only those people in your Buddy List can see you as On-line. Specific People can be used at various times so that you could only have Friends and not work colleagues contact when at home for instance.You have to add people to the list via the Button alongside. Block All speaks for itself. It is not the same as Invisible in iChat 4 and 5 as you can not see who is On-Line either but it does save Logging out or Quitting iChat when you want to get on and do something. Blocking Specific People I find is very useful. As I test with people want them to be able to contact me but once in a while I do find someone who seems to have no Social Skills and not respect Away messages.
The content is available to use when you are Logged out of AIM, unlike the picture below which is "greyed out" as I was logged in.

When you click on the Server Settings tab it will show you the Server name and the TCP port that iChat is using to Log in to that server with. The default server is login.oscar.aol.com and the port is 5190. (There are no longer any other servers available)
(Please Note the picture is an iChat 4/5 one that can do an SSL Login which changes the name to slogin.oscar.aol.com)
The port can be changed (when you are Logged out of AIM (Valid accounts). The reason for this is that iChat uses Port 5190 on the TCP protocol for Logging in and sending basic Text Chats and also on the UDP protocol for File Sending and Direct chats. Some modems and Routers that have to use Port Forwarding do not like this dual use - so changing the port here is useful. (Port Forwarding only allows a Port to be forwarded once to one IP(Computer) and some devices insist and list Protocols as well which makes it seem the port is to be forwarded twice)
From testing it seems that the AIM servers will actually accept a login on any port (there are, in fact, 65535 of them). The suggestion is to use one below 1024 as these ports are always open in a routing modem or router. On the whole we recommend using port 443 as this is used by some mail applications and secure Websites and will also be open in the Mac Firewall in versions up to Tiger (10.4.x). Leopard and Snow Leopard OSes "certificate" the apps to allow them if the Firewall is On.
If you use a Proxy server to get on to the Internet this is also where it is set, although generally iChat seems to do better with use of the System wide Proxies set in the System Preferences > Network pane. (On the whole it does not like Proxies.)
The Server name will be where you got your Jabber ID from. Your ID will be in an email type format (not that it is usable as an email account) and when you add the name iChat will take the suffix as the Login Server's Name and fill in the Server Settings for you. Most Jabber Servers also use port 5222 to Login if not using SSL. Those using SSL use port 5223.
There are exceptions to the above most notably GoogleTalk. If you Login to your Account Google (Mail) you can enable Talk then connect to their server via iChat.
However as it uses your Googlemail ID as the GoogleTalk ID and you have to select Google as the Account type and the software sorts out the Server name. In iChat 3 you could only add it as a Jabber account and it needs to be manually changed to talk.google.com The Login port it uses is also different and you need to check it list port 5223 as well. (Edit 2024:- I have removed a broken link here to Google's info on this but it has been removed as they no longer run the Google Talk server)
Next - How to Add Buddies
© Ralph Johns June 2010
This page is about the Start Up/First Run Screens or however you describe login and reqistration screens on first run of an App. It does this by showing the actual screens from the Welcome Screen to AIM valid Registration page (Includes @me.com and @mac.com Options) as well as a Button to get a Name. This has options to lead to the AIM or MoblileMe and the then repurposed @mac.com registration for Free Names.
After that comes the Bonjour Activation Screen followed by the Jabber one. Next is the AV page where you Check the Video and see if the bar underneath the Video will indicate the App has enough Audio input. There is one more screen that there is no picture for and that is a "Done" Screen.
Next the page talks about Alternatives and the steps and places needed to enter the same info from the iChat Menus and Preferences. These can be needed if you were not sure on the First Run and entered nothing in the Start Up Screens.
As most of the things you need to are in the Preferences thare are some pictures to help with the text. After the methods to enter an New Account details and choose AIM or Jabber it talks about the right hand side of the Accounts pane which for AIM ones have a Security tab where you can Block and Allow people. That is followed by the Server Settings where AIM valid Logins can use the then New secure Login server and the Jabber ones can sort out Server Name issues (Google Talk) and also ports for Secure Logins if the Jabber server uses them.
© Ralph Johns and others where credited.
Revised September 2024

Made on a Mac®